

Today we’re going to look at how to retouch a landscape photo in Adobe Lightroom without the use of any fancier post processing techniques in Adobe Photoshop. The Adobe Creative suite is an incredibly powerful set of tools for any creative, however with it’s newer subscription models, it’s not something everyone is able to afford. This tutorial is perfect for improving the quality of your photography and a great way to polish images for your social media account. I have a number of images in my landscape portfolio and hanging around my home that were done using this very same method.
Want to know the best part? It’s completely free and incredibly easy to follow.
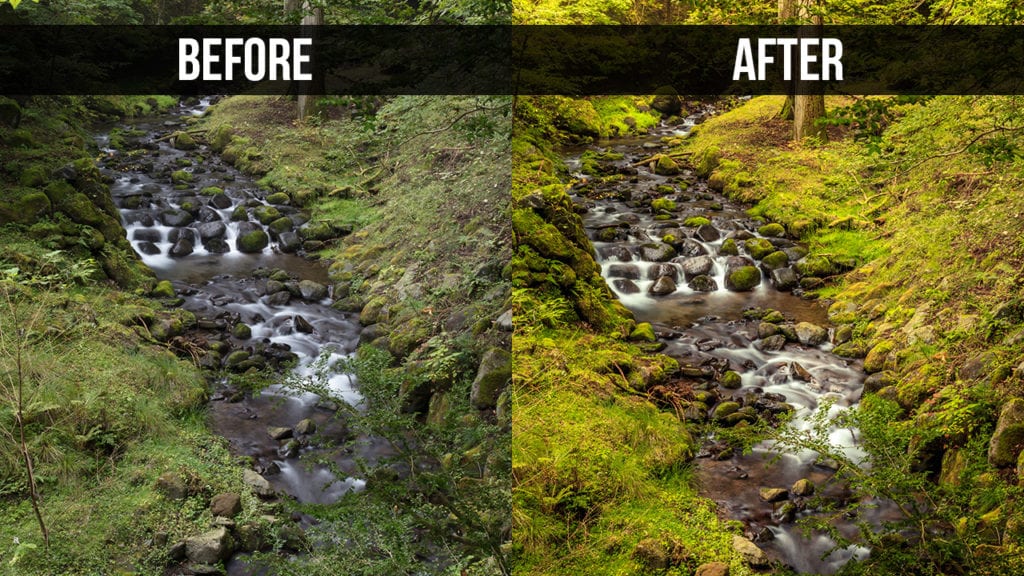
In the video below, I guide you through a quick but complete, retouch and editing process in Adobe Lightroom. We cover almost all of the tools in the Develop tab including;
- The Histogram
- Crop Overlay (R)
- Spot Removal (Q)
- Graduated Filter (M)
- Radial Filter (Shift+M)
- Adjustment Brush (K)
- HSL (Hue, Saturation and Luminosity)
- Tonal Curves
- Profile Correction
- Sharpening
- Dodging and Burning
- Cross Processing / Toning
- Vignetting
- Camera Presets
- White Balance
Using these tools to compliment each other, you can completely transform a photograph into something spectacular in very little time. It’s important to remember that if you are planning on following a long with this retouching tutorial, you need to make sure you are editing a RAW image (.CR2 on Canon, NEF on Nikon). If you are unsure about how to set your camera to take RAW images, you can read how to do it on Canon’s website.
It’s been a blast making this video for you all. I have to apologise for the sub-optimal video/audio quality. Unfortunately after I had processed everything out, I noticed an error in the encoder used to record the original footage. At least we know for next time. If you have any questions about how to retouch a landscape photo in Adobe Lightroom, or about any of the tools we cover in the video – please feel free to leave a comment below and I’ll do what I can to provide further assistance.
8 Comments
[…] into an easy rhythm. Before long, you’ll be running through the checklist in your head and the whole editing process will become second […]
Thanks for this tutorial!! The best I’ve seen so far. I appreciate all the tips and tricks and you’ve got a great voice – calm and easy to understand. You should do some more, if only to help those of us who need it!
Thanks again.
Thank you so much Jem – i’m glad you found the tutorial useful. I’ll definitely look to do some more in the near future 🙂
I’ve watched a tonne of landscape editing photos recently, many of which I’ve purchased, and this has easily been the best. Thank you so much! New fan here. 🙂
Hi Hayley,
Wow, thanks for such great feedback! I had a lot of fun making it. Maybe I should make a few more! Thanks again!
Hi Blake
I saw your post on the Brisbane Photographers Facebook page. I am a photoshop user and thought this morning I would sit down and watch your Lightroom tutorial.
It is a great video for someone like me who has never edited in Lightroom.
I have just come back over the holidays with some landscapes so I am now going to try an edit in Lightroom with them. I think I will redo some other images from Tassie I took last year and then compare my Lightroom edits with my photoshop edits.
Thanks for posting.
Hi Gaye,
Thanks for the feedback, I’m so glad you found the video helpful. Be sure to show me what you come up with after re-editing some of your images!
All the best!
Great video! Thanks for sharing your tips and methods using Lightroom. I’m looking forward to trying this on some of my own photographs after my trip to Germany this year! Thanks again!